Java Development Kit (JDK) allows you to code and run Java programs in your Windows computer. It is recommended that you install only the latest version. But installing Java is not that straightforward Best Selenium training institute in Bangalore. This guide will help you to do that with 100% success.
First, let's check if you have Java installed in your system. To check
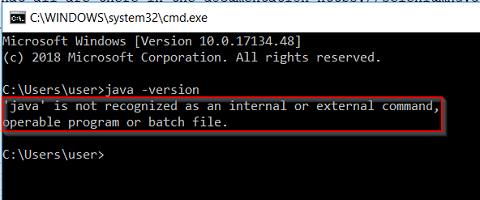
Else it will show the message as below, you have to install it now

First, let's check if you have Java installed in your system. To check
- Press Windows + R
- Open Command prompt by typing "cmd", hit okay
- In Command Prompt type "java -version", hit enter
Else it will show the message as below, you have to install it now

Follow these steps -
Download and Install Java Development Kit (JDK) for Windows:
Download Java Software Development Kit (JDK) here -
- Click on download link under Oracle JDK

- From here chose the JDK according to your system. For me it is jdk-11.0.1_windows-x64_bin.exe
- Once the JDK is downloaded, find the file and open it to run the installation process.
- Click on Next button when needed, once the installation is complete close the program.
Now again verify if the JDK is installed properly, by typing "java -version" in command prompt.
If still, it shows "'java' is not recognized as an internal or external command, operable program or batch file." message, then you have to set environment variables
If still, it shows "'java' is not recognized as an internal or external command, operable program or batch file." message, then you have to set environment variables
How to set Environment Variables in Java: Path and Classpath
Follow these steps -
- Go to Control Panel
- Click on "System"

- Click on "Advanced system settings"

- Click on "Environment Variables..."

- Under System Variables choose Path then click on "Edit"
 Now here you have to add the Java path
To do that find the java path in your c drive - Go to C Drive > Program Files > Java > JDK-11.0.1 (this folder name will be different depending on the version of java) > bin
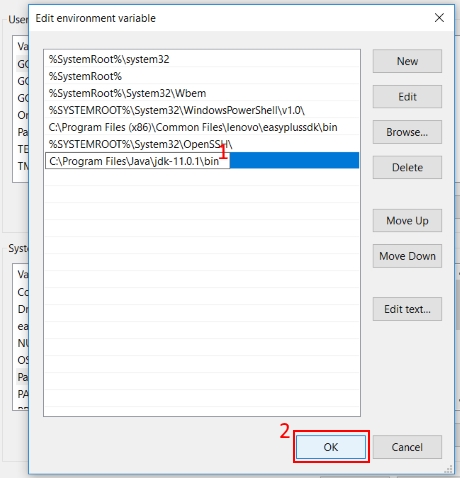
- Copy the path, it will look like this C:\Program Files\Java\jdk-11.0.1\bin (JDK version might be different)
Now come back the System Variables Edit window (Step 5) - Click on "New" to add a new Java path

- Paste the path you have just copied, click "Ok"

Now once again verify if the JDK is installed properly, in command prompt.
If you have followed all the steps properly, you will have it perfectly installed on your Windows system Best Selenium Training Institute in Bangalore
Read more: How to Install Selenium WebDriver in Windows
If you have followed all the steps properly, you will have it perfectly installed on your Windows system Best Selenium Training Institute in Bangalore
Read more: How to Install Selenium WebDriver in Windows